Shade and Style: A DIY Guide to Building a Pergola on Your Deck
Adding a pergola to your deck is an excellent way to enhance both shade and style in your outdoor living space. Whether you’re looking to create a relaxing retreat or a decorative focal point, learning how to build a pergola on a deck is a rewarding DIY project that can increase your home’s value and curb appeal. In this guide, we’ll walk you through the steps to construct a beautiful and functional pergola on deck, with expert tips to ensure your project is a success.
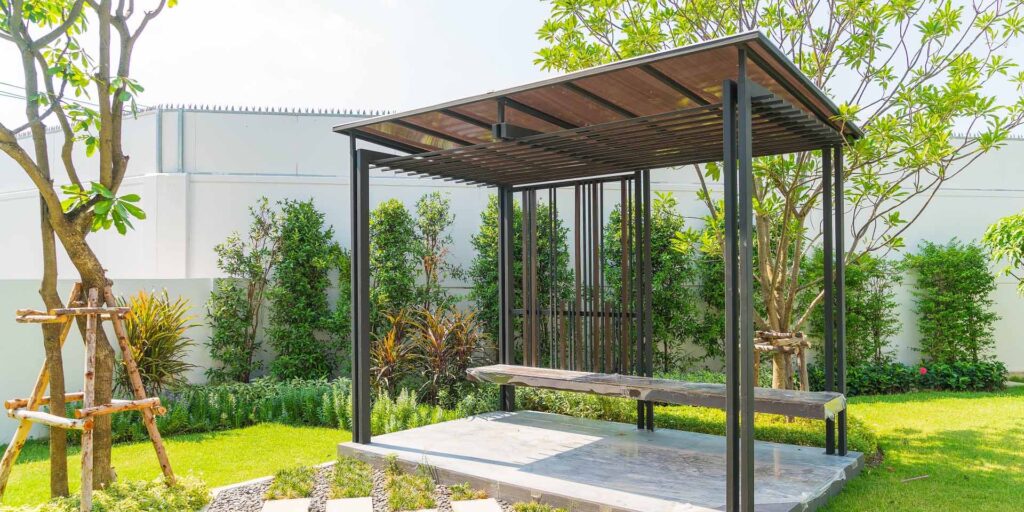
Why Build a Pergola on Your Deck?
A pergola offers numerous benefits for your outdoor space:
- Shade: Provides relief from direct sunlight while maintaining an open, airy feel.
- Style: Adds architectural beauty that complements your deck’s design.
- Functionality: Serves as a versatile space for outdoor dining, lounging, or entertaining.
- Support for Greenery: Ideal for climbing plants and hanging decor to create a lush outdoor oasis.
Whether you’re designing a small retreat or a grand structure, a DIY pergola is a cost-effective way to elevate your outdoor experience.
Tools and Materials You’ll Need
Before you begin building, gather the necessary tools and materials for your pergola project:
- Pressure-treated lumber or cedar wood
- Post anchors or deck mounts
- Screws, bolts, and washers
- Drill and screwdriver
- Level
- Measuring tape
- Saw (circular or miter saw)
- Ladder
- Safety gear (gloves, goggles)
For premium pergola materials and inspiration, check out Teza Pergola for stylish and durable options.
Step-by-Step Guide: How to Build a Pergola on a Deck
1. Plan Your Pergola Design
Before you start construction, determine the size and design of your pergola:
- Decide on the height, width, and depth of the structure.
- Sketch the design, including the placement of posts, beams, and rafters.
- Check your deck’s weight capacity to ensure it can support the pergola.
- Obtain any necessary permits from your local building authority.
2. Install the Pergola Posts
The posts are the foundation of your pergola and must be securely anchored to the deck.
- Step 1: Mark the locations for the pergola posts on the deck.
- Step 2: Use post anchors or deck mounts to secure the posts to the deck surface. Make sure they align with your design.
- Step 3: Attach 4×4 or 6×6 posts to the anchors and use a level to ensure they are perfectly vertical.
- Step 4: Tighten bolts and screws to secure the posts firmly in place.
Tip: Use pressure-treated wood or cedar for long-lasting durability in outdoor conditions.
3. Attach the Beams
The beams will connect the posts and form the base structure for the rafters.
- Step 1: Cut the beams to size based on your pergola dimensions.
- Step 2: Position the beams horizontally across the top of the posts.
- Step 3: Secure the beams with screws or carriage bolts, ensuring they are level.
- Step 4: Double up the beams if extra strength is needed for larger pergolas.
4. Install the Rafters
Rafters provide shade and give the pergola its distinct appearance.
- Step 1: Cut rafters to length and notch the ends for a decorative look.
- Step 2: Space the rafters evenly across the beams, marking their locations for precision.
- Step 3: Attach the rafters to the beams using screws or brackets.
- Step 4: Ensure the rafters extend evenly on both sides for a symmetrical design.
Tip: For enhanced shade, consider spacing the rafters closer together or adding crossbeams.
5. Add Finishing Touches
Once the pergola frame is complete, personalize it with these finishing touches:
- Stain or Paint: Protect the wood and enhance the appearance with weather-resistant stain or paint.
- Climbing Plants: Install hooks or trellises to support climbing plants like ivy, wisteria, or jasmine.
- String Lights: Add string lights or lanterns for ambiance during evening gatherings.
- Curtains or Shades: Install outdoor curtains or retractable shades for added privacy and protection.
Tips for Building a DIY Pergola
- Measure Twice: Double-check all measurements before cutting materials.
- Use Quality Materials: Opt for pressure-treated wood, cedar, or composite materials for durability.
- Secure Connections: Ensure all beams, posts, and rafters are securely fastened for structural stability.
- Check Local Codes: Always verify local building codes and deck weight limits before starting construction.
Why Choose a Teza Pergola?
For a high-quality and stylish pergola solution, explore Teza Pergola. Teza offers premium outdoor structures designed to enhance your deck and patio with modern style and durability:
- Custom Designs: Available in various sizes and styles to fit your outdoor space.
- High-Quality Materials: Built to withstand the elements and provide long-lasting performance.
- Easy Installation: DIY-friendly options with detailed instructions for hassle-free construction.
A Teza Pergola is the perfect addition to elevate your deck’s beauty and functionality.
Conclusion
Learning how to build a pergola on a deck is a rewarding DIY project that can transform your outdoor space into a stylish and functional retreat. By following this guide, you can create a custom pergola on deck that adds shade, style, and value to your home. Whether you’re tackling the project from scratch or looking for high-quality materials, Teza Pergola has everything you need to bring your vision to life. Start building today and enjoy the benefits of your beautiful new pergola!